Tutorial 09 – Derived Classes
What We Learn
We study examples of how to create mappings between classes, derived as well as standard.
Modeling
The model file for tutorial 9 contains derived classes with example mappings. All derived classes can also be found in a Class Diagram called Derived classes. You can use this diagram to deploy all derived classes in one go.
See here for more information about the syntax.
Hint: double-click on a class-to-class mapping or open a derived class in a Data Flow diagram.
Some cases:
- Automatic mapping of similar properties (attributes and association ends)
- Most Code/Name/Parent organization units: No explicit property assignments needed
- Calculating values for attributes (class Just to show some cases)
- Constants
- Direct references to the source class’ properties
- Direct references to a column in the source
- Calculations using constants as well as property references
- Subquery as value
- Using parameters @SourceHash, @Source
- Creating a new class containing a subset of another class
- Person -> Child
- Replacing a class with another
- Employee -> Employee
- Building a custom class
- Project membership -> Project member
- Denormalizing different structures
- Fixed level organization unit -> Fixed level to flat
- Fixed level organization unit -> Fixed level to flat 2
- Recursive organization unit -> Recursive to reverse ragged
- Recursive organization unit -> Recursive to same flat as source
- Recursive organization unit -> Recursive to full flat
- Mapping between raw model classes
- Organization unit -> Recursive organization unit
- Merging several classes to one
- Fixed level organization unit -> Merged organization unit
- Fixed level organization level 1 -> Merged organization unit
- Fixed level organization level 2 -> Merged organization unit
- Fixed level organization level 3 -> Merged organization unit
You will also note that all classes that are part of a class-to-class mapping have automatically been materialized for the benefit of the derived classes.
Run, Deploy And Inspect
Study the generated SQL by opening the SQL View and clicking on the classes to view the SQL code of the class view.
Deploy the derived classes and query the class views. Note the behaviour of the deployment package generator when deploying dependent classes. Choose to include all source classes that the derived classes depend on, as these will now be automatically materialized. After installation, run materialization commands for these tables. If you don’t, the newly installed derived class views will be empty.
Inspect the contents of the derived classes and their source classes by opening the Data Grid and clicking on the classes.
Try It Out
Go back to your personal project file and derive the Project member class from the Project membership class like this:
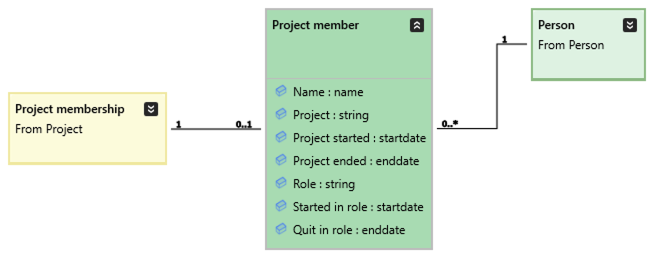
Define the property assignments to work like this:
- Name is of format Last name + comma + First names
- Project is the code + colon + name of the project associated with the source class
- Project started and Project ended are the respective star and ends dates of the project
- Role is the role name of the associated role
- Started in role and Quit in role are the start date and end date of the project membership, respectively
- The reference to Person is maintained from the original source class
- The original source class Project membership (the is the Business key in this case as well) is referenced directly, to provide a path to the original source structure.
Run the model, redeploy the new class and double-check that it works. If it doesn’t, check out its definition in the Tutorial 09 model. The installation will overwrite the one installed earlier in this tutorial.
Next tutorial (under construction)