What We Learn
Deploying new content that extends the model, but does not add elements to existing objects. How yellow Role classes are converted to standalone links, how state tracking works for previously loaded data that does not exist in the source anymore, as well as how soft deletion can be implemented in the view layer.
Modeling and mapping
Look at the structure and content of the ProjMaster.PROJECT, ProjMaster.PERSON_PROJECT and ProjMaster.PROJECT_ROLE tables in DS_DemoData.
You will come to the conclusion that the following steps need to be taken:
| Source table… | …goes to the Staging Area as… | …and maps to the Class |
|---|---|---|
| DS_DemoData.ProjMaster.PROJECT | ProjMaster.RAW_PROJECT | Project |
| DS_DemoData.ProjMaster.PROJECT_ROLE | ProjMaster.RAW_PROJECT_ROLE | Person’s role in project |
| DS_DemoData.ProjMaster.PERSON_PROJECT | ProjMaster.RAW_PERSON_PROJECT | Project membership |
Model the three new classes using the newly mapped class and property names, like below. Re-use the existing Person class. Set the Implement value to True for the new classes. The new classes should have the following structure in your modeling tool:
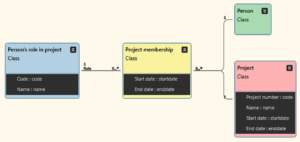
Next decide on the keys: from the source data you can draw the conclusion that Project number is most likely the Business key for Project, and Code would appear to be the Business key for Person’s role in project. Project membership, however, is worthy of a discussion.
Project membership represents a typical Participation pattern: something participates in some activity in a specific role during a specific period of time. It would make sense that the natural key in this case consists of the combination of the referenced classes as well as the Start date attribute, since a person could be in the same role in the same project during different times, or in different roles at the same time. It is technically possible that, even though the key feels logically sound, that some of the key values could change (for example, if someone corrects an error in the role or the start date). A change like this makes a hash key representing the same real world incident to “change”, leaving us with two instances describing the same incident, but with slightly different details. To catch this, set State tracking method to Simple for the Project membership class and, in D# Engine, set the Soft Delete parameter value to true after deployment. This can be done when we know we will always load the complete set of data representing the class. So in this case, we will always load all Project membership data, and we want to track when a previously loaded membership disappears for whatever reason. Note that soft deletion requires the state tracking to be active, but state tracking does not necessitate that you activate the soft deletion.
To finalize the latest additions:
| Do this… | …and this happens |
|---|---|
| Set Project.Project number as Business key. | Project gets a hub. |
| Set the Person’s role in project.Code as business key. | Person’s role in project gets a hub. |
| Set the Primary key of Project membership to Person, Project, Role, Start date. | Project membership gets a link to represent it, not a hub. |
| Set Project membership’s State tracking method to Simple. | A state tracking satellite will be created for the link. Whenever a previously loaded Project membership is missing from the source data, it is marked as Deleted (D) in this satellite. If the data reappears, it is marked as Created (C). A Soft Delete mechanism then hides all objects from the view layer that have been deleted and not subsequently recreated. |
| Set Implement to true for the three new classes. |
Export the model to your working directory and open the model export file with D♯ Engine, or just refresh D♯ Engine, if you have it open.
Open the existing ProjMaster mappings file and add the source columns to the mapping rows, and complete them with PK and FK info and the appropriate Class and Property names. Save the file. Refresh D♯ Engine.
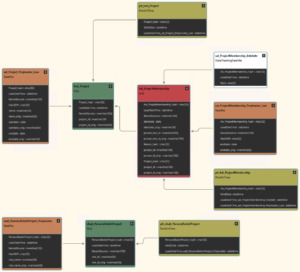
In the Conceptual Model pane, locate the subfolder containing the ProjMaster classes, select it and click the Table Structure command to get the ER diagram for this particular portion of the Raw Vault. Open the tables so that their columns are showing and click Arrange. Verify that your Raw Vault looks like below before proceeding with the installation. Click the image to enlarge.
Deploy the changes
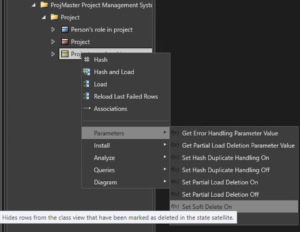
In the Conceptual Model pane, make a selection that contains the three new classes and deploy like in the previous tutorial. After deployment, select the Project membership class from the Conceptual Model hierarchy, and set its Soft Delete parameter to true. By toggling the Soft Delete parameter on and off, the corresponding view will react immediately by hiding or showing rows that are marked as deleted.
Run Tutorial Scripts
Run each of the tutorial script commands fron the Help -> Tutorials -> Intro Course -> Project Tutorial menu, and inspect the results.
| Script | Source data | Main points of interest |
|---|---|---|
| Step 1: Load initial project data | First project data load. | Inconsistency with the Project manager dates. |
| Step 2: Memberships updated | Start date has been changed for two memberships, one fixed a mistake, the other was a mistake. | Project manager dates consistent, other membership updated from 2006 to 2016. Two rows in the link table (the ones with the original start date) have been marked as Deleted in the state satellite. Soft Delete hides these from the view. |
| Step 3: Mistake corrected | The mistake made in the previous step was corrected (start date changed back). | Link row with wrong hash has been marked as Deleted, and the one marked in the previous step has been marked as re-Created. |
| Step 4: Project ends | The project and all memberships are closed. | Many end dates set, some wrong, some correct, some not set at all. |