Tutorial 01 – Person Tutorial
What We Learn
UI: How to add and configure basic submodels, classes, attributes and associations. Database connection.
DW: Basic hub / satellite functionality, and the difference between green Party-Place-Thing- and blue Description-classes. We see how satellites and PiT-tables behave and how the view layer handles multiple sources and history data.
Creating the Project
To get going, create a new DSharp Studio project. You will be presented with the Project Settings view. Set the root database name to DemoDW. Inspect the other parameter values, but leave them as default.
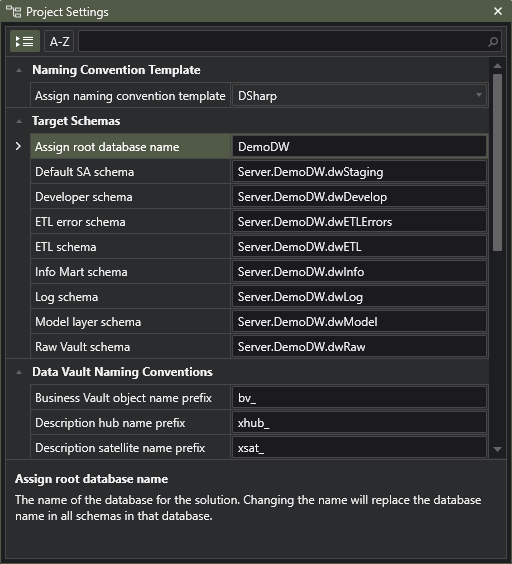
You can save the project in a location of your choice, but the project folder should be called DemoDW for the tutorial test scripts to open.
In the Azure Labs training environment the default location is here (there is a shortcut on the desktop): C:\Users\DSTrainingUser\AppData\Roaming\DSharp\DSharp Studio\Workspace\Projects\Tutorials\01. Professional Course\DemoDW
The DS_DemoData Database
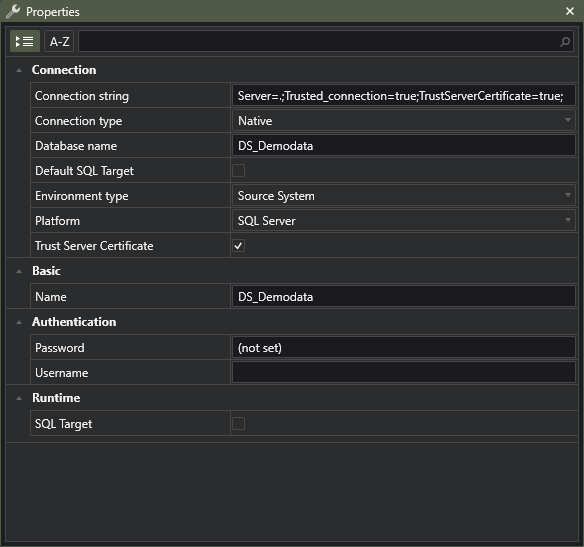
First, create a new connection in the Connections pane. Any new connection will default to a local installation of SQL Server, which we will use in this course. Set the Database name to DS_DemoData and check the Trust Server Certificate check box. This adds the text ;TrustServerCertificate=true to the end of the default connection string.
Microsoft requires all target servers to either have a certificate, or you to explicitly trust the certificate, even if there is none (as is the case with this local installation). For security reasons, we do not include the trust parameter in the connection string by default, so this is left to the end user to configure manually for each connection.
Using the newly created connection, locate the simulated source system data from the PersMaster person register and the ProjMaster Project Management software in the DS_DemoData database. For this first tutorial, only consider Person and Gender data from PersMaster and Person data from ProjMaster. Also, pretend that PersMaster’s Person data does not have the email and Home phone attributes, we will add those to the model as part of the next tutorial.
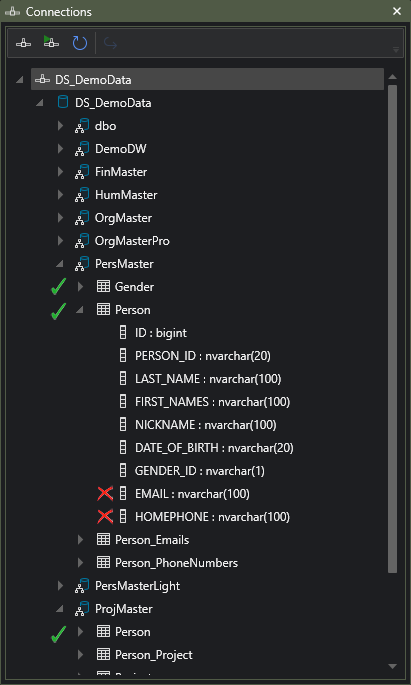
Inspect the data using the Data Grid and get to know it. Make your design decisions at this time, and consider the process of building the model using DSharp Studio as documenting your design. Contrast this to Workshop behaviour, where the model is built by means of discussion and real time refinement towards the final agreed-upon model.
The DemoDW Database
Similarly to above, create another connection to point to the (not yet existing) DemoDW database. For the DemoDW connection, additionally check both the Default SQL Target and SQL Target checkboxes.
Modeling
As the structure of this tutorial data is normalized and makes sense, the class design will very closely resemble the original source table structure. This may not always be the case, and we strongly encourage spending time designing a good model instead of always copying source structures. Ultimately this is a decision for the project architect, and there should always be an explicit decision concerning design guidelines like these.
Our goal is to create a Conceptual model consisting of submodels, where each submodel contains just “the right classes”. Partitioning the model into coherent submodels is recommended from the very start, to get a decently structured model from the get-go.
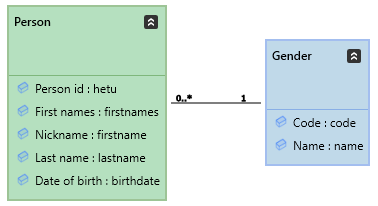
Inside Conceptual model, create a new submodel called Person. Model the classes Person and Gender like below. Refer to this for Archetype definitions.
Now proceed with the following steps:
| Do this… | …and this happens |
|---|---|
| Check the Implement parameter for both classes. | DW objects will be generated for the classes.
Note: ALWAYS do this for all classes you want to deploy, even if not specifically mentioned. |
| Set Person.Person Id as Business key. | The Person class will get a hub. References to the Person class will be implemented as hashes in link tables. |
| Set the Person.Date of birth attribute’s Rate of change to Never. | Mapping a source table’s column to this attribute will result in that column’s value being loaded into a satellite containing data that should never change. The default value for Rate of change is Low. |
| Set the Person -> Gender relation’s Rate of Change to Never. | As the Person -> Gender “soft reference” is implemented in a satellite, the Gender code will always be mapped to a satellite marked as containing never-changing data.
Note that only implementations of relations to Description classes are affected by this choice. For other classes the parameter is informational only. |
| Set Gender.Code as Business key. | The Gender class will get a hub. Blue Description classes work logically as lookup tables, so references to Gender will be code-based, from satellites. In the view layer, however, a runtime generated hash will be used as a consistent way of referencing views within the view layer. |
Mapping
Mapping source data to class properties will result in DSharp Studio creating empty tables in the Staging Area that are capable of receiving data described by the table portion of the mapping information (the 5 first columns in the mapping file). These tables can be re-written as views if so desired.
The tables will be installed during the deployment process. To make this happen, we will need to create new mapping files for each simulated source system. From File -> Mappings -> New Mapping File, create one file for PersMaster and one for ProjMaster. The empty mapping files will then open.
Next, add all the columns to be mapped to their respective mapping file, one file at a time. See here for a more detailed explanation.
For reference, mapping file structure is described here.
Omit the email and phone number columns for now.
At this point you should also mark the primary key columns with an “x” and the foreign key columns with a dot-notation syntax to the referenced primary key column. This is not always necessary, but highly recommended, since DSharp Studio may need this information in more complex situations where it derives the source table relationships from the Conceptual model’s association data. Besides, you also get a source ER model with references if you do this, so it will be worth it.
Your completed 01_Mappings_PersMaster.csv mapping file will look like this:
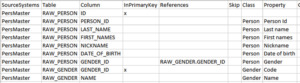
Note that RAW_Person.ID is a purely technical surrogate key, and as such it is not interesting, so it has not been mapped and will not end up in the DW. Decisions whether to include or exclude technical columns like this should be done by the project architect at the beginning of the project.
Now do the mapping for the ProjMaster Person data, the second “source system”, using the same approach. The end result should look like this:

Notice that not all attributes will always be present in all sources where a class is loaded from, and the mapping files reflect this as well. Also, in time, Person (and other classes) may gain new attributes when new source systems are added.
Save the project and the mapping files.
Generating the DW
Run/build the model by first selecting Conceptual model from the Models pane and then pressing the Play button. You can also select only one class, or actually any set of classes, for conversion, but selecting the entire Conceptual model ensures that also orchestration procedures will be generated. Generating orchestration procedures requires the entire target table structure and dependencies to be known, so during this course you should always build the entire Conceptual model when building the model.
If the model and mappings are in sync, DSharp Studio will proceed to generate the Data Vault implementation. If not, you will get a list of issues to correct. You can use the Corrective Actions to fix the issues, or you can do it manually using the available Design Mode UI.
When the necessary objects have been generated inside DSharp Studio, you can double-click the Server.DemoDW.dwRaw-schema in DWModel that is now available in the Models pane, and take a look at the entire schema structure. Verify that you have the following Raw Vault structure (click image to enlarge).
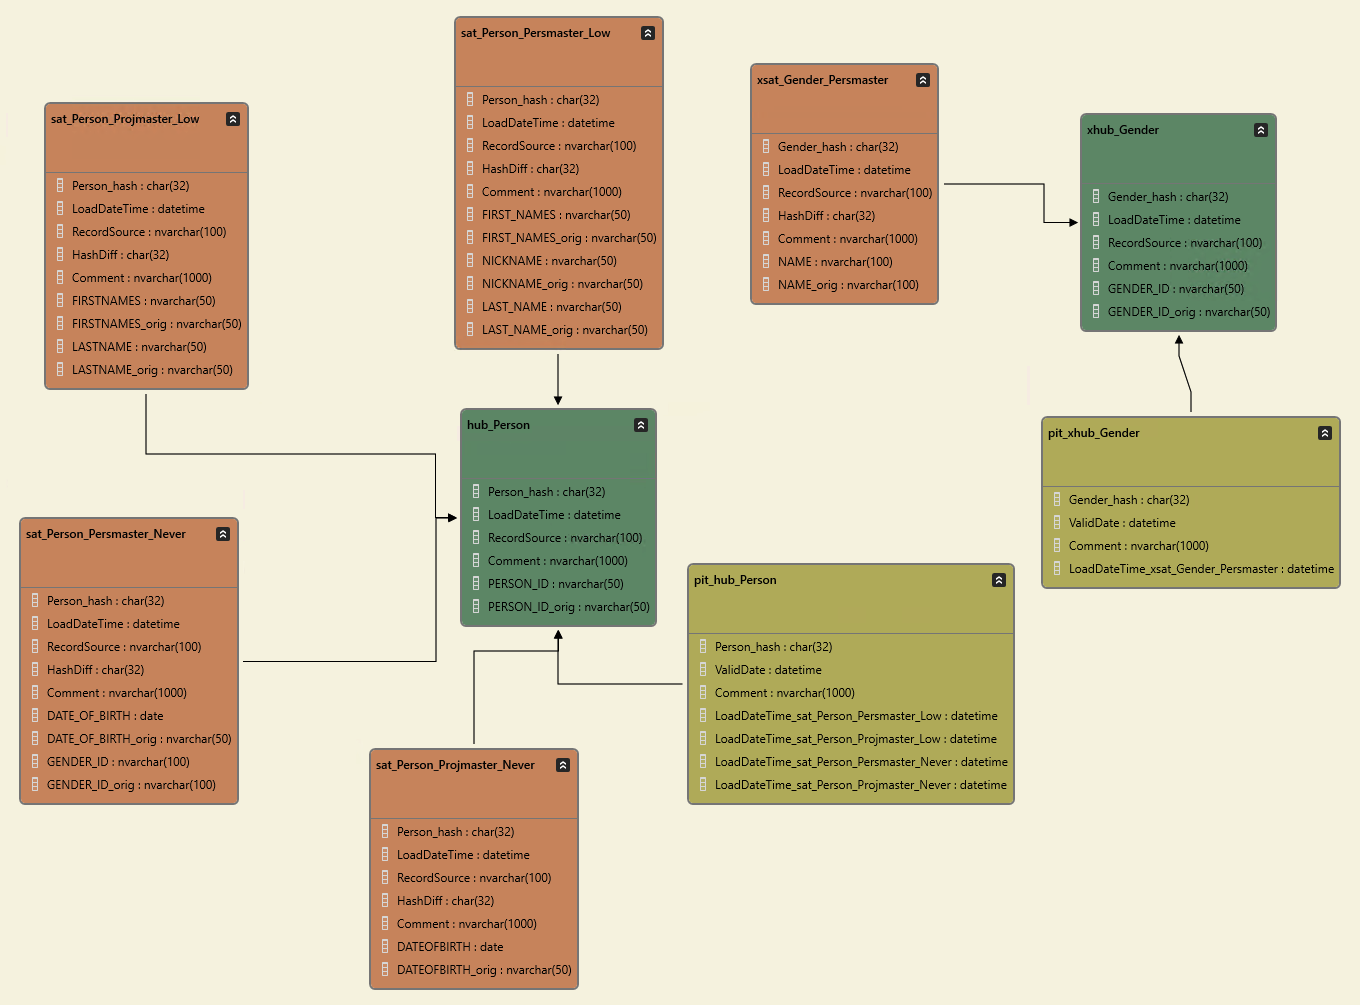
You should also inspect the created objects in the Class Implementation pane.
Install the DW
At this point, there exists no DemoDW database to do anything in. To create an empty DW database, run the Install -> Install DW Core command. Once installed, the DW database is ready to accept further installations. Also create a new Connection called DemoDW the same way you did earlier, but set the Database name to DemoDW and Default SQL Target to true. This way you can access the DW that is under construction.
At this point, you want to install the new classes, Person and Gender. Select them and run the Install -> Create Incremental Installation Package command. The installation command operates on the Extended selection, so you can select the classes individually, or by selecting their common submodel Person, or by selecting the entire Conceptual model.
As a result of the command, you will get a hierarchical structure containing the deployment process. Press the Deploy button, and DSharp Studio will by default generate the SQL code, save it as a file, and then execute it. In the default course environment, SQL Server Management Studio should start with the generated file opened, so you should just need to execute the generated code by pressing the Execute button in SSMS. If not, open the file manually from the Workspace\Output\SQL folder. Alternatively, you can in DSharp Studio click on Settings -> SQL to Clipboard, which copies all SQL output to the clipboard instead of writing it to a file. In this case, you can just paste the SQL wherever you think it should go.
After a successful install, do some surfing in the newly created database structures. Browse the SQL code for:
- the different levels of orchestration procedures
- hash procedures
- error procedures
- load procedures for each table type
- the view layer in the dwBV-schema
Run Tutorial Scripts
Run each of the tutorial script commands from the Help -> Tutorials -> DSharp Studio Professional Course -> Person Tutorial menu, and inspect the results.
| Script | Source data | Main points of interest |
|---|---|---|
| Step 1: Load some base data | Two source systems, 3 persons in each, 1 person in both. | The log has been populated. Person and Gender related hubs and satellites all contain data. The views publish the data correctly. |
| Step 2: Source data updated and deleted | Danielson changed to Danielsson. Eriksson has been removed. |
The satellite contains two versions of Danielsson’s name. The Point-in-Time table reflects the change. The c_Person view shows the latest name version for Danielsson, and Eriksson is present, as is correct. |