Tutorial 08 – Loading Multiple Classes From One Source
What We Learn
How to split source data into several classes.
Scenario
We are expanding the DW with the HumMaster HR system, which contains employee and salary related information. Let’s look at the source data in DS_DemoData.HumMaster.EMPLOYEE:

Essentially this appears to be a Person with an added Employee number. We don’t want to add Employee number as an attribute to Person, since all persons aren’t employees. Instead we would like to use this same data to source both our existing Person class and a new class, Employee. This is enough for one tutorial. We will handle the rest of HumMaster in the next tutorial.
Mapping
Mappingwise, a new phenomenon here is that one source table maps to more than one class.
To demonstrate an additional feature, we will go about this a bit differently. Create a new mapping file for HumMaster and imagine a class structure like below, but don’t draw it yet. Map the data to this soon-to-exist structure as shown.
We start by adding the entire source data structure to the new mapping file 05_Mappings_HumMaster.csv and we map the columns that correspond to the Employee class like this:

We note that the PERSON_ID column uniquely identifies Person, so we go ahead and map that to represent the association between Employee and Person. Any other source column that doesn’t have a corresponding property in Employee is left unmapped.
Next we will need to map the Person properties. We notice that the data on one row can be split to the two corresponding classes like this:
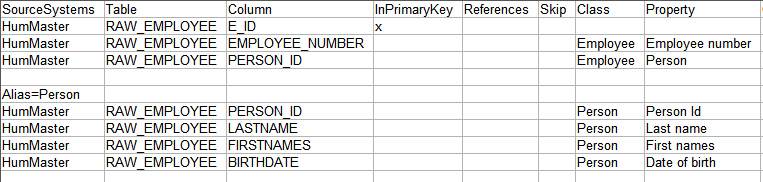
By using the Alias=Person tag before the group of columns that are mapped to the Person class, we create a new table-to-class mapping set. Since the data comes from the same table, and even the same row, the value in the PERSON_ID column works as both the source for the Business key of the Person class as well as the source for the relation between Employee and Person, which is why it is used in both mappings.
Note the absence of a reference from PERSON_ID in the first mapping group to PERSON_ID in the other. So even though there is a logical relation between these two separate data sets, PERSON_ID is still the same column in the same table, and there really doesn’t exist such a foreign key reference where PERSON_ID points to itself.
At this point, save the mapping file and build the model without having modeled the Employee class.
Run Model, First Attempt
Running the model will result in a critical error. The mapping file contains a source table definition that is mapped to a class that does not exist. This class could be something that is yet to be modelled, or it could be a spelling mistake. In any case the conversion does not proceed beyond this point.
In the Analysis pane you will find an error message stating that “There are mappings to missing class Employee”. This is a fact, since we have not yet modelled the new class. Next, take a look at the Corrective Actions dropdown menu next to the error message. You have two options:
- Create class Employee from mapping files, and
- Open 05_Mappings_HumMaster.csv
The mapping file option is the solution if there is a clear misspelling in the class name, but in this case we want the missing Employee class to be created for us. Select the command from the dropdown menu. You will see that it creates the missing Employee class with attributes that correspond to the ones found in the mapping file.

A practical application for this is when a database structure has been extracted to a spreadsheet, or similar. Just “translate” the technical table and column names to business terms and save the result as a csv file compatible with the DSharp Studio mapping file, and an entire model’s worth of classes will be created for you by just clicking Corrective Actions. Once you have the classes, tweak to perfection, and let Class Analysis assist you, as presented below.
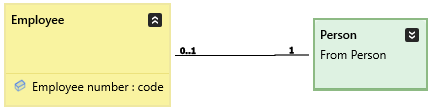
Before fixing the details, let’s make one structural change. The Person attribute in Employee is actually a reference to the Person class, and so it should be replaced by an association. Do make this change, do this:
- select the Person attribute in the Models hierarchy
- locate the Person class in the hierarchy, and while pressing ctrl, click on the class. Now you have a multiple selection with an attribute as the first element and a class as the second. The Convert to Association command reacts to this kind of selections. Run that command from Edit menu, or just press ctrl-R, and the attribute will be replaced by an association.
Now finalize the model:
| Do this… | …and this happens |
|---|---|
| Move Employee to its own submodel by selecting the Employee class in the tree and running the Organize -> Move Down command. Then rename the new submodel to Human Resources. | A submodel called Employee will be created and the Employee class will be in it. After renaming the submodel, double-click on it to view its contents. |
| Set Employee Archetype to Role | It turns yellow. Also, Class Analysis starts to react to it. |
| Using Class Analysis’ Corrective Actions, set Employee to be implemented | The remaining warnings in the Class Analysis for Employee turn critical. |
| Using Class Analysis’ Corrective Actions, add Employee number to the key | There is a new suggestion that the Employee number might be a problem in the future, as it is not explicitly set to be a non-changing value. As you believe the Employee number will always uniquely identify the employee, perform the task below. |
| Using Class Analysis’ Corrective Actions, set Rate of Change of Employee number to Never | The suggestion will go away. |
| Using Class Analysis’ Corrective Actions, set the datatype of Employee number to code | Problem solved. |
| Correct the multiplicity of the Person side of the Employee – Person association to match the image above. | The model will state that an Employee is a specific Person, and that a Person either is or is not an Employee. |
Save the model and run it.
Deploying
Select the new Human Resources submodelin the Models pane and then click the Open Implementation in ER Diagram button. Then select lnk_Employee and click on the Show Referenced button in the model editor’s toolbar to show hub_Person. Finally expand the tables to show the columns and arrange the diagram.
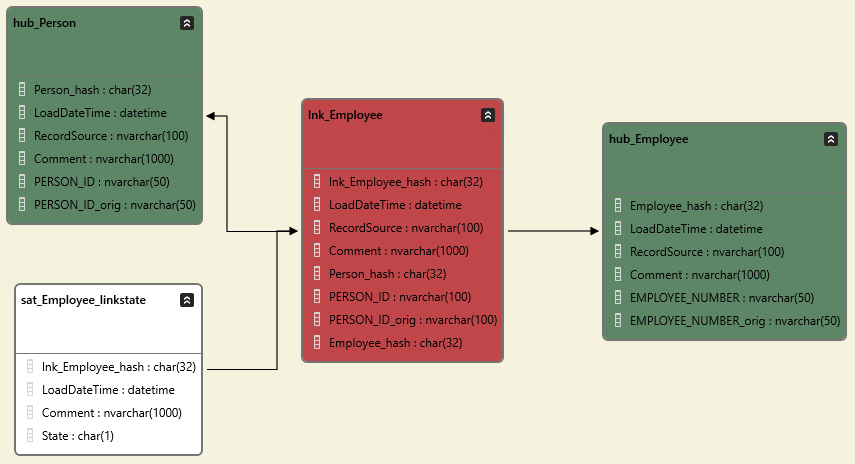
If your ER model looks like this, deploy Employee as well as Person (due to new mappings having been created for Person).
Run Tutorial Scripts
Run the following tutorial script commands fron the Help -> Tutorials -> DSharp Studio Professional Course -> Loading Multiple Classes From One Source menu, and inspect the results.
| Script | Source data | Main points of interest |
|---|---|---|
| Step 1: Load Employee And Person | Both Employee and Person populated from same data. |